If Google Search Console is reporting “Excluded by ‘noindex’ tag” for pages you want indexed, something on your site is telling search engine crawlers to skip those URLs. The fix depends on where the directive is coming from.
This guide walks through every common source of the noindex directive in WordPress, from plugin settings and theme files to server-level HTTP headers, and shows you how to verify the fix using Google Search Console.

Table of Contents
- What the Noindex Directive Actually Does
- Step 1: Check Your SEO Plugin Settings
- Step 2: Check WordPress Reading Settings
- Step 3: Check Your Theme Files
- Step 4: Check the X-Robots-Tag HTTP Header
- Step 5: Check for WooCommerce-Specific Noindex Behavior
- Step 6: Use Code to Override Stubborn Noindex Settings
- How to Verify the Fix
- Quick Reference: Common Noindex Sources in WordPress
- Final Notes
What the Noindex Directive Actually Does
The robots meta tag sits in the <head> section of your HTML and tells search engine crawlers how to handle that page. When it contains a noindex directive, it looks like this:
<meta name="robots" content="noindex, follow">

This tells Googlebot (and other crawlers) not to add the page to the search index. The page can still be crawled and links on it can still be followed, but it will not appear in search engine results pages (SERPs).
Robots Meta Tag vs. Robots.txt: Know the Difference
These are two separate mechanisms, and confusing them is one of the most common mistakes webmasters make.
Robots.txt file controls whether a crawler can access and crawl a page at all. It sits at the root of your domain (yoursite.com/robots.txt) and uses directives like allow and disallow to manage crawler access.
The robots meta tag controls what happens after a crawler loads the page. Directives like noindex and nofollow tell the search engine whether to index the content or follow its links.
Here is the key point: if robots.txt blocks a page, the crawler never sees the meta tag. And if the meta tag says noindex, the crawler sees the page but keeps it out of the index. Fixing one does not fix the other.
Step 1: Check Your SEO Plugin Settings
If you are using Yoast SEO, Rank Math, All in One SEO, or SmartCrawl on a WordPress website, the plugin is the most likely source of the noindex directive. These plugins control the robots meta tag for your entire site and for individual pages.
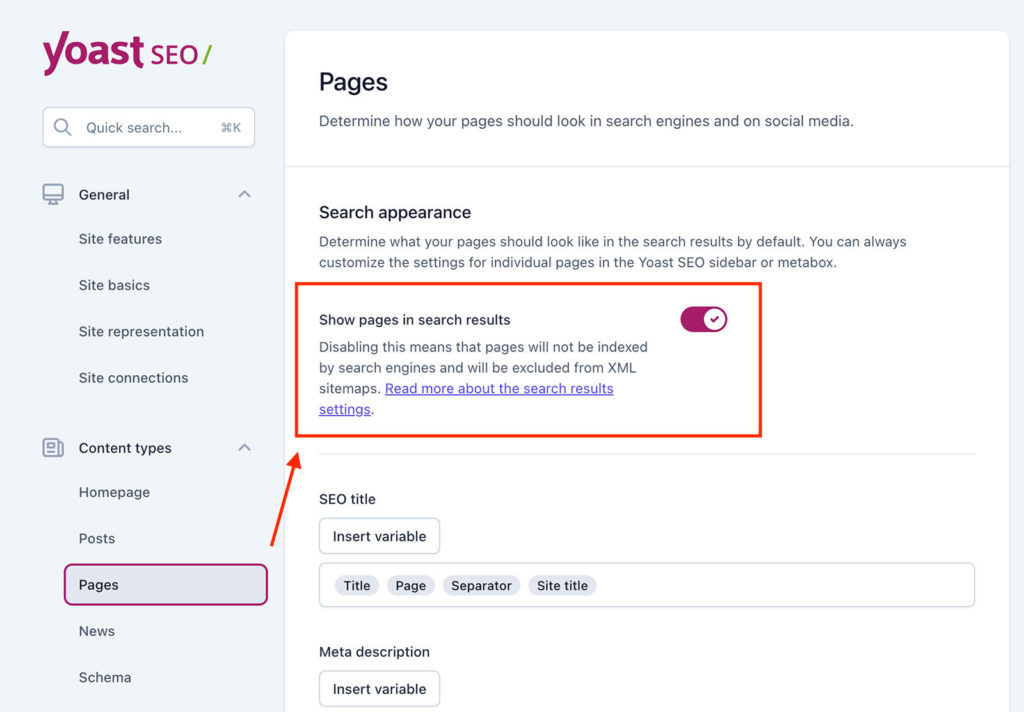
Site-Wide Settings (Yoast SEO)
- Go to your WordPress dashboard and click SEO in the sidebar.
- Select Search Appearance.
- Under the Content Types tab, find the content type that is being noindexed (Posts, Pages, or any custom post type).
- Set “Show [content type] in search results?” to Yes.
Check every content type, including custom post types registered by plugins like WooCommerce or a portfolio plugin. If a content type is set to noindex at the site-wide level, every post or page of that type will be excluded.
Individual Page Settings (Yoast SEO)
- Edit the page or post in question.
- Scroll down to the Yoast SEO meta box.
- Click the Advanced tab.
- Set “Allow search engines to show this post in search results?” to Yes.
An individual page override will take priority over the site-wide setting, so check both.
Taxonomy and Archive Settings
SEO (search engine optimization) plugins often noindex certain archive types by default, and for good reason. Date-based archives, tag archives, and author archives can create duplicate content issues when they surface the same posts that already appear on category pages or the blog index.
Before removing noindex from archive pages, consider whether those pages add unique value. If your tag pages just list the same posts as your category pages, keeping them noindexed is the right call. Focus on ensuring your primary content pages (posts, pages, product pages) are set to index.
In Yoast, check these under SEO > Search Appearance > Taxonomies and Archives.
Step 2: Check WordPress Reading Settings
WordPress has a built-in setting that adds a noindex directive to your entire site. This is commonly enabled during development or staging and sometimes forgotten when the site goes live.
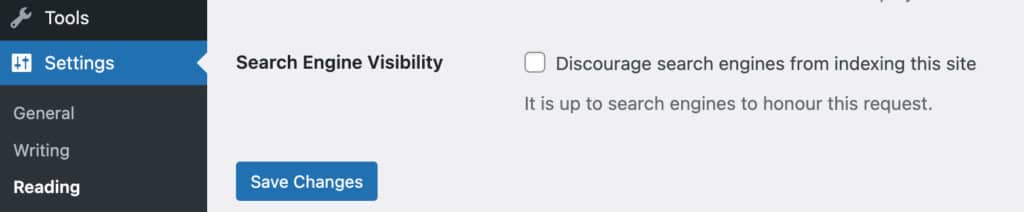
- Go to Settings > Reading in your WordPress dashboard.
- Scroll to the Search Engine Visibility section.
- Make sure the checkbox next to “Discourage search engines from indexing this site” is unchecked.
- Click Save Changes.
When this box is checked, WordPress outputs a noindex meta tag on every page of the site through the wp_no_robots function hooked into wp_head. Unchecking it removes the directive site-wide.
Bedrock and Environment-Based Overrides
If your WordPress site runs on a Bedrock-based setup, the WP_ENV environment variable can override this setting. When WP_ENV is set to development, WordPress forces the blog_public option to false, which injects the noindex meta tag regardless of what the Reading settings show in the dashboard. Make sure your production environment has WP_ENV set to production.
Step 3: Check Your Theme Files
Some WordPress themes add the noindex directive directly in the theme’s header.php file, bypassing both plugin settings and the Reading settings checkbox.
- Go to Appearance > Theme Editor in your WordPress dashboard (or access the file via FTP/SFTP).
- Open the header.php file.
- Search for a robots meta tag that looks like this:
<meta name="robots" content="noindex, nofollow">- If you find it, either remove the entire line or change the content attribute to:
<meta name="robots" content="index, follow">- Save the file.
Back up the file before editing. If you break the theme’s header, your site’s front end can go down. If that happens, restore the original file via FTP or your hosting provider’s file manager.

Step 4: Check the X-Robots-Tag HTTP Header
This is the one most guides miss. The noindex directive can also be delivered through an HTTP response header called X-Robots-Tag, which works exactly like the meta tag but is set at the server level. This is especially relevant for non-HTML files like PDFs, images, and other documents that do not have a <head> section for a meta tag.
How to Check for It
Run this command in your terminal to inspect the response headers of any URL:
curl -I https://yoursite.com/page-url
Look for a line like:
X-Robots-Tag: noindex
If it is there, the noindex directive is being set by your server configuration, not by WordPress.
Where It Comes From
The X-Robots-Tag is typically set in one of these places:
- Nginx configuration (inside a location block or server block)
- Apache .htaccess file (using Header set X-Robots-Tag “noindex”)
- A CDN or reverse proxy like Cloudflare (through a Workers script or Transform Rule)
- A WordPress security or caching plugin that modifies response headers
If you find this header and cannot trace it to a specific config file, check with your hosting provider. Managed WordPress hosts sometimes add server-level headers that are not visible from the WordPress dashboard.
Step 5: Check for WooCommerce-Specific Noindex Behavior
WooCommerce adds noindex to several page types by default, including the cart page, checkout page, and My Account page. This is intentional and generally correct, since these pages have no value in search results.
However, WooCommerce can also noindex pages unexpectedly through the wc_page_noindex function. If you are seeing noindex on product pages or shop pages that should be indexed, check:
- WooCommerce > Settings > Products to confirm the shop page is set correctly.
- Your SEO plugin’s WooCommerce integration settings, which can override WooCommerce defaults.
- Whether a conflict between WooCommerce and your SEO plugin is causing double noindex directives.
Step 6: Use Code to Override Stubborn Noindex Settings
If you have checked every setting and the noindex directive persists, a theme or plugin may be injecting it programmatically through a filter. You can override this with a code snippet in your theme’s functions.php file or in a site-specific plugin.
Override Yoast SEO’s Robots Output
add_filter('wpseo_robots', 'force_index_on_key_pages', 999);

function force_index_on_key_pages($robots) {
    if (is_home() || is_front_page()) {
        return 'index, follow';
    }
    return $robots;
}
This filter runs at priority 999, which means it fires after most other filters and will override Yoast’s default output for the specified pages. Adjust the conditional checks (is_home(), is_front_page(), is_search(), is_page()) to target the specific pages you need indexed.
Remove WordPress Core’s Noindex Output
If WordPress core itself is injecting the noindex tag (via the wp_no_robots function), you can remove it:
remove_action('wp_head', 'wp_no_robots');
Only use this if you have confirmed that the core function is the source and the Reading settings checkbox is not resolving the issue.
How to Verify the Fix
Removing the noindex directive is only half the job. You need to confirm that search engine crawlers see the change.
Use Google Search Console’s URL Inspection Tool
- Open Google Search Console and select your property.
- Enter the URL of the affected page in the URL Inspection tool at the top of the screen.
- Click Test Live URL to see how Googlebot currently reads the page.
- Confirm that the “Indexing allowed?” field says Yes and that no noindex directive appears in the details.
- If the live test looks clean, click Request Indexing to ask Google to re-crawl the page.
Understand the Timeline
Google does not re-crawl pages instantly. Even after you request indexing, it can take anywhere from a few days to several weeks for the change to be reflected in search results. For lower-authority pages that are crawled infrequently, it can take even longer.
If Google crawled the page while the noindex directive was still in place, it may take months before a routine re-crawl picks up the change. Using the URL Inspection tool to request indexing accelerates this, but there is no way to force an immediate update.
Validate the Fix in Bulk
If multiple pages were affected, go to the Pages report in Google Search Console (under Indexing). Find the “Excluded by ‘noindex’ tag” row, click into it, and use the Validate Fix button. Google will then re-check a sample of the affected URLs and update the report as it processes them.
Quick Reference: Common Noindex Sources in WordPress
| Source | Where to Check | Fix |
|---|---|---|
| SEO plugin (site-wide) | Plugin settings > Search Appearance > Content Types | Set content type to “Show in search results” |
| SEO plugin (per-page) | Edit page > SEO meta box > Advanced tab | Set to “Yes” for search results |
| WordPress Reading settings | Settings > Reading > Search Engine Visibility | Uncheck the box |
| Theme header.php | Appearance > Theme Editor > header.php | Remove or modify the meta tag |
| X-Robots-Tag HTTP header | Terminal: curl -I [URL] | Edit server config (nginx, .htaccess, CDN) |
| WooCommerce | WooCommerce settings + SEO plugin integration | Check shop/product page settings |
| WordPress core function | wp_no_robots in wp_head | remove_action(‘wp_head’, ‘wp_no_robots’) |
| Bedrock / WP_ENV | .env file | Set WP_ENV=production |
| Caching | Server or plugin cache | Clear all caches after making changes |
Final Notes
After making any changes to noindex directives, clear every layer of cache on your site: page cache, object cache, CDN cache, and any server-side caching from your host. A cached version of the page with the old noindex tag will continue to tell crawlers to stay out of the index until the cache is purged.
If you have worked through every step in this guide and the noindex directive still appears in Google Search Console’s live URL test, the issue is likely coming from a server-level configuration or a plugin that is not surfacing the setting in any visible UI. At that point, inspecting the full HTTP response headers and the rendered HTML source is the fastest path to finding the source.
Published on: 2023-03-31
Updated on: 2026-04-02