Screaming Frog SEO Spider is a desktop-based crawler used by SEO professionals to audit websites for technical SEO issues. It can detect broken links, duplicate content, missing meta descriptions, redirect chains, and more. Whether you manage a small blog or a large enterprise site, installing Screaming Frog is the first step toward running a thorough website audit.
This guide covers how to download and install Screaming Frog on Windows, macOS, and Ubuntu, activate your license key, configure storage settings, and start your first crawl.

Table of Contents
Why Use Screaming Frog?
Before jumping into the installation process, here is a quick look at what Screaming Frog can do once it is up and running:
- Crawl your site to find broken links, missing alt text, and duplicate content
- Analyze page titles, meta descriptions, and canonicals across your entire site
- Audit internal links and external links to understand your site structure
- Validate structured data and hreflang attributes
- Integrate with Google Search Console, Google Analytics, and PageSpeed Insights
- Render JavaScript websites using a built-in Chromium WRS engine
- Generate XML sitemaps and review robots.txt configurations
The free version covers up to 500 URLs, which is enough for smaller sites. The paid version removes that limit and unlocks advanced features like custom extraction, scheduled reporting, and crawl comparison.
System Requirements
Before downloading, make sure your machine meets the minimum specs. Screaming Frog is a desktop-based tool that runs locally, so your hardware matters.
- Operating system: Windows (64-bit), macOS, Ubuntu, or Fedora
- RAM: 8 GB minimum for smaller sites. Screaming Frog recommends 16 GB for crawling large websites with thousands of pages.
- Storage: An SSD is recommended, especially if you plan to use database storage mode for large crawls
- Processor: A 64-bit operating system is required. The tool will not run on a 32-bit machine.
If you are crawling JavaScript-heavy websites with rendering enabled, expect higher memory and CPU usage.
Step 1: Download Screaming Frog
Head to the official Screaming Frog website and navigate to the downloads page. The SEO Spider is available for Windows, macOS (Apple Silicon and Intel), Ubuntu, and Fedora.
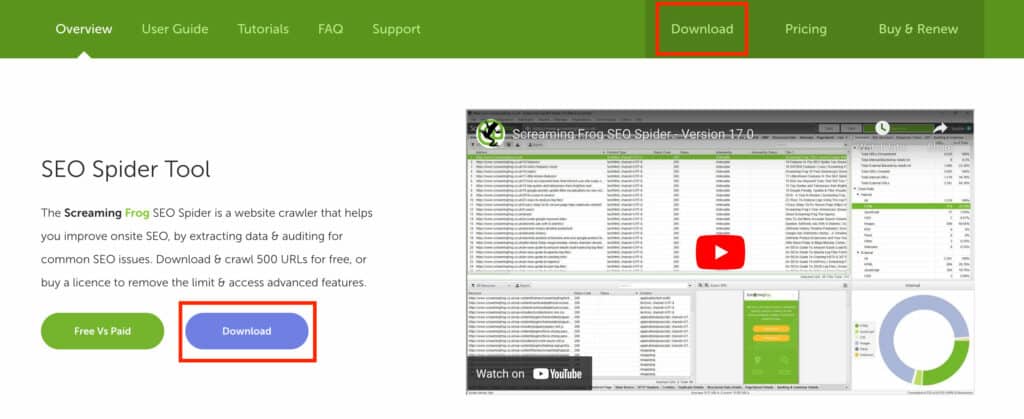
Select the version that matches your operating system.
Step 2: Install the Software
Windows: Open the downloaded .EXE file from your downloads folder and follow the installation prompts. Once complete, Screaming Frog will appear in your Start menu.

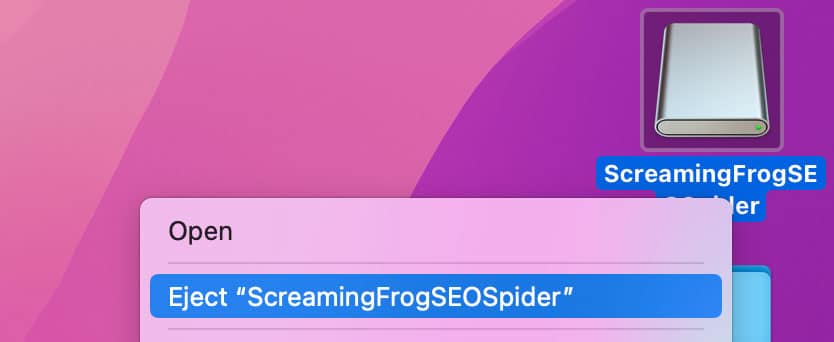
macOS: Open the .DMG file, then drag the Screaming Frog icon into your Applications folder. After the copy completes, eject the DMG from your desktop and move the installer file to the trash to free up storage space.
A helpful habit: right-click the Screaming Frog icon in your dock and select “Keep in Dock” so the app is always easy to access.
Ubuntu: Download the .deb package and install it using your package manager or via the terminal. Screaming Frog will then be available from your application launcher.
Step 3: Activate Your License Key (Paid Version)

The free version works immediately after installation with no activation required. If you have purchased a license, here is how to activate it:
- Open Screaming Frog
- Go to Licence > Enter Licence in the top menu
- Enter your username and licence key exactly as they appear in your purchase confirmation email
- Click OK and restart the application when prompted
Once activated, the 500 URL crawl limit is removed and all paid features become available. If the key does not validate, double-check for extra spaces in the username or key fields, and confirm your licence has not expired.
A Screaming Frog licence costs $209 USD per year. For anyone doing regular SEO audits or managing multiple client sites, the cost-per-use makes it one of the most affordable technical SEO tools available.
Step 4: Configure Storage Settings
By default, Screaming Frog stores crawl data in RAM (memory storage mode). This works fine for small crawls, but for larger sites you will want to switch to database storage mode.
To change this:
- Go to File > Settings > Storage Mode
- Select Database Storage
- Choose a location on your SSD for the crawl database
Database storage mode writes crawl data to disk instead of holding it all in memory. This means you can crawl much larger sites without running out of RAM, and your crawl data persists even if the application closes unexpectedly.
If you are working with a solid-state drive, database mode is the recommended configuration.
Step 5: Configure Your Crawl
Before launching a crawl, take a minute to review the configuration options. The default settings work for most sites, but a few adjustments can save time and produce cleaner data.
Go to Configuration > Spider to access the main crawl settings. From here you can control which resource types to crawl (images, CSS, JavaScript, PDFs), whether to follow internal and external links, and how the crawler handles canonicals, pagination, and hreflang attributes.
Include and Exclude URL patterns: Under Configuration > Include and Configuration > Exclude, you can use regex to limit the crawl to specific sections of a site or skip URLs you do not want analyzed. For example, you can exclude the /wp-admin/ subfolder or include only URLs that match a /blog/ pattern. This is useful when you only need to audit a portion of a large site.
JavaScript rendering: If you are crawling a JavaScript-heavy website built on a framework like React, Vue, or Angular, switch the rendering mode under Configuration > Spider > Rendering to JavaScript. This activates the built-in Chromium WRS engine, which renders pages the same way a modern browser does. Be aware that JavaScript rendering uses significantly more memory and slows down crawls.
Schedule crawls: The paid version lets you schedule crawls to run automatically at set intervals. Go to File > Scheduling to set up recurring audits, which is helpful for monitoring large sites or client portfolios.
Once your configuration is set, you can move on to launching the crawl.
Step 6: Start Your First Crawl
With Screaming Frog installed and configured, you are ready to run your first website audit.
Spider Mode (default): Enter your site’s homepage URL into the “Enter URL to spider” field at the top of the interface and click Start. Screaming Frog will crawl your entire site by following internal links from the starting URL.
List Mode: If you want to crawl a specific set of pages rather than an entire site, switch to List Mode by going to Mode > List. You can then upload or paste a list of URLs to crawl.
Spider mode is best for full site audits. List mode is useful when you need to check a specific group of pages, such as URLs flagged in Google Search Console or a set of landing pages you are optimizing.
Once the crawl completes, use the tabs and filters in the interface to review your data. The Internal tab shows all discovered URLs. The Response Codes tab helps you find 404 pages and redirect chains. Filters for missing alt text, duplicate content, and page title issues are available throughout.
Step 7: Save and Reopen Your Crawls
Crawls can take anywhere from a few minutes to several hours depending on site size and configuration. Saving your work as you go means you do not lose progress if you need to step away or restart the application.
Saving a crawl: Go to File > Save to save the current crawl. If you are running in database storage mode, the crawl is automatically written to disk as it runs, but you should still save it to give it a name and store it in the Crawls window for easy access later. In memory storage mode, saving is essential because crawl data lives in RAM and is lost when the application closes.
Pausing and resuming: You can pause a crawl at any time by clicking the Pause button in the top toolbar. This is useful if you need to free up system resources or check on data partway through. Click Resume to pick up where you left off. Crawls saved in database storage mode can also be reopened and resumed in a new session.
The Crawls window: Go to File > Crawls to open the Crawls window, which lists all your saved crawls. From here you can open, rename, duplicate, or delete crawls. Renaming is helpful when you are managing audits for multiple clients or running comparison crawls on the same site over time.
Project folders: You can organize saved crawls into project folders within the Crawls window. This keeps client work separated and makes it easier to find historical crawl data when you need to compare results across audits.
Exporting data: To export crawl data for reporting or sharing, use the Export button on any tab, or go to Bulk Export and Reports in the top menu for more comprehensive options. Exports are available in CSV, Excel, and Google Sheets formats.
What to Look For After Your First Crawl
Once your crawl completes, the real work begins. Screaming Frog surfaces a wide range of technical SEO issues, and knowing where to look first saves time on every audit.
Response codes: The Response Codes tab shows the HTTP status of every URL discovered. Filter by Client Error (4xx) to find broken links and 404 pages, and by Redirection (3xx) to identify redirect chains and loops. Redirect chains slow down crawl efficiency and can dilute link equity, so flag any chain with more than one hop.
Page titles and meta descriptions: The Page Titles and Meta Description tabs include filters for missing, duplicate, too long, too short, and over the pixel width limit. These are some of the most common issues found in audits and the easiest to fix at scale.
Canonicals and meta robots: The Canonicals tab shows pages with missing, multiple, or self-referencing canonical tags. The Directives tab reveals meta robots settings like noindex and nofollow. Misconfigured directives are a frequent cause of pages disappearing from search results, so this is worth a careful review.
Hreflang attributes: For multilingual or multi-region sites, the Hreflang tab validates your hreflang implementation and flags missing return links, invalid language codes, and inconsistent declarations.
Images and alt text: The Images tab lists every image discovered, with filters for missing alt text and oversized files. Missing alt text is both an accessibility issue and a missed opportunity for image search visibility.
Duplicate content: The Content tab identifies near-duplicate and exact-duplicate pages based on configurable similarity thresholds. Duplicate content can split ranking signals across multiple URLs and is worth consolidating where possible.
Core Web Vitals and page loading speed: Connect Screaming Frog to the PageSpeed Insights API under Configuration > API Access to pull Core Web Vitals data (LCP, INP, CLS) for every crawled URL. This lets you identify slow pages at scale rather than checking them one at a time.
Structured data: The Structured Data tab validates schema markup against Google’s guidelines and flags missing required properties, invalid types, and parsing errors.
After reviewing these areas, use the Bulk Export menu to pull issue lists for your reporting workflow or to hand off to developers for remediation.
Screaming Frog Alternatives
Screaming Frog is the industry standard, but a few alternatives are worth knowing about. Sitebulb offers a more visual reporting layer and is popular with agencies that present findings to non-technical clients. Lumar (formerly Deepcrawl) and OnCrawl are cloud-based crawlers built for enterprise sites that exceed what a desktop tool can handle. Botify focuses on log file analysis alongside crawling. For lighter use cases, Visual SEO Studio and Xenu’s Link Sleuth are free options, though their feature sets are limited compared to Screaming Frog.
Troubleshooting Common Installation Issues
If you run into problems during or after installation:
- Make sure you are running a 64-bit operating system
- Verify you have enough RAM (8 GB minimum, 16 GB recommended)
- On macOS, confirm you have granted the app permission to run under System Preferences > Security & Privacy
- If your licence key is not working, check for typos and ensure your subscription is active
- For crawl performance issues, try switching to database storage mode and closing other memory-heavy applications
The official Screaming Frog website has a detailed FAQ section covering platform-specific issues.
FAQs
How do you use Screaming Frog for free?
What is the difference between Spider mode and List mode?
Is Screaming Frog worth the cost?
Published on: 2022-08-30
Updated on: 2026-05-27